# Building a Layout for nsquared dashboard
This guide will walk you through the process of creating your own layout for the nsquared dashboard, using the [`SimpleLayout` project](https://github.com/nsquaredsolutions/dashboard/tree/main/Samples/SimpleLayout) as a reference. Follow these steps to build a layout from scratch.
## Outline
### 1. Prerequisites
- Basic knowledge of C# and XAML (Avalonia UI)
- .NET 10 SDK installed
### 2. Project Setup
- Create a new folder for your layout
- Add a new Class Library project (e.g., `SimpleLayout`)
- Reference `nsquared.dashboard.api` nuget package in your project
- Add Avalonia NuGet package
1. Start by creating a new C# class library project named SimpleLayout.
```bash
dotnet new classlib --name SimpleLayout
```
This will create a new folder named SimpleLayout containing C# project named SimpleLayout, and a code file named Class1.cs.
2. Rename the file `Class1.cs` to `Layout.cs`
3. Rename the class in the code to `Layout`
```cs
namespace SimpleLayout;
public class Layout
{
}
```
4. In the `SimpleLayout.csproj` file make sure the `TargetFramework` is `net10.0`
```xml
net10.0
```
5. In the `SimpleLayout.csproj` file add a `TargetExt` field below the `TargetFramework` line
```xml
.Layout
```
6. Add a package reference to the `nsquared.dashboard.api` NuGet package, from PowerShell you can do this with the following command.
```sh
dotnet add package nsquared.dashboard.api
```
7. Add a package reference to the `Avalonia` NuGet package, from PowerShell you can do this with the following command.
```sh
dotnet add package Avalonia
```
8. In the `Layout.cs` file add a `using` to import the `nsquared.dashboard.api` namespace
```cs
using nsquared.dashboard.api;
```
9. In the `Layout.cs` file implement the `ILayout` interface in the Layout class
```cs
public class Layout : ILayout
```
10. Add the required properties and methods to the `Layout` class
```cs
public string Name { get; set; } = "Simple Layout";
public List Components { get; set; } = new List();
public void Load()
{
// Load components here
}
```
A layout is a collection of components that define how the dashboard will be displayed. Each layout must implement the `ILayout` interface, which requires a `Name`, a list of `Components`, and a `Load()` method to initialize the components.
A component is a reusable UI element that can be added to a layout. Each component must implement the `IComponent` interface, which defines properties such as `AssemblyFile`, `TypeName`, `Margin`, `Size`, `Alignment`, and `Parameters`.
For this SampleLayout we will create a simple background component that displays a gradient background.
11. Create a new Avalonia UserControl named `BackgroundComponentControl.axaml` in the project folder.
```xml
```
12. Create a code-behind file for the `BackgroundComponentControl.axaml` named `BackgroundComponentControl.axaml.cs`.
```csharp
using Avalonia.Controls;
namespace SimpleLayout;
public partial class BackgroundComponentControl : UserControl
{
public BackgroundComponentControl()
{
InitializeComponent();
}
}
```
13. Create a new class named `BackgroundComponent.cs` that implements the `IComponent` interface.
```csharp
using nsquared.dashboard.api;
public class BackgroundComponent : IComponent
{
public string AssemblyFile => "SimpleLayout.Layout";
public string TypeName => "SimpleLayout.BackgroundComponentControl";
public string Name { get; } = "Simple Layout";
public ComponentMargin Margin { get; set; }
public ComponentSize Size { get; set; }
public ComponentVerticalAlignment VerticalAlignment { get; set; }
public ComponentHorizontalAlignment HorizontalAlignment { get; set; }
public Dictionary? Parameters { get; set; }
public BackgroundComponent()
{
VerticalAlignment = ComponentVerticalAlignment.Stretch;
HorizontalAlignment = ComponentHorizontalAlignment.Stretch;
Margin = new ComponentMargin
{
Top = 0,
Left = 0,
Bottom = 0,
Right = 0
};
Size = new ComponentSize
{
Width = 1920,
Height = 1080
};
}
}
```
14. In the `Layout.cs` file, add a new component to the `Load()` method.
```csharp
public void Load()
{
Components.Add(new BackgroundComponent());
}
```
### 3. Project Structure
Your project structure should look like this:
- Main layout XAML file (e.g., `BackgroundComponentControl.axaml`)
- Main layout code-behind (e.g., `BackgroundComponentControl.axaml.cs`)
- Layout implementation class (e.g., `SampleLayout.cs`)
- Component implementation class (e.g., `BackgroundComponent.cs`)
- Project file (`.csproj`)
### 4. Building and Testing
- Build your project to generate the SimpleLayout.Layout assembly
- Add your layout to the nsquared dashboard layouts
- Test your layout in the nsquared dashboard application
Build the layout project using the following command:
```sh
dotnet build
```
This will compile your layout and create a `.Layout` file in the output directory.
Run nsquared dashboard and add your layout from the Settings panel.
Open the layout settings in the nsquared dashboard Settings.
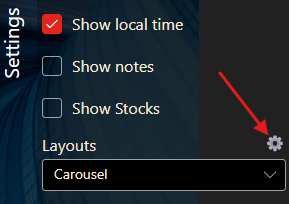
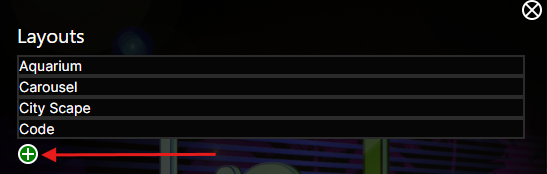
Click on the "Add Layout" button
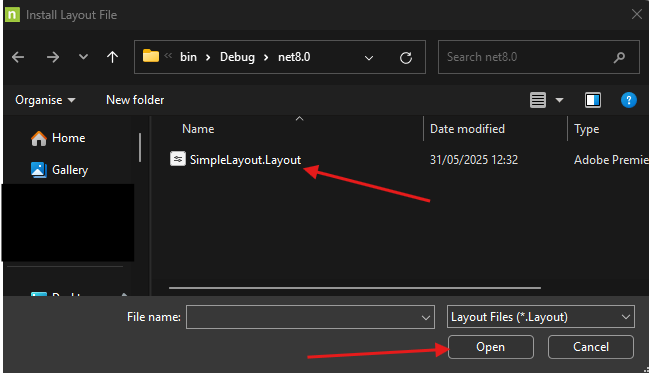
Find the `SimpleLayout.Layout` file in the file dialog and Open it.
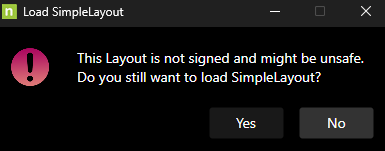
As the Layout is not signed you will be asked if you trust it. You only just created this layout so you trust it, click Yes.
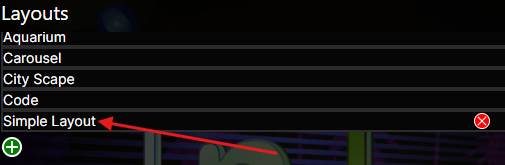
You should now see your layout in the list of available layouts.
Close the panel and select your new layout from the Layout dropdown in the Settings panel.
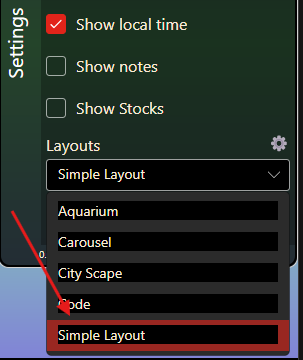
The new layout should now be displayed in the dashboard.
### 8. Tips and Best Practices
- Use the [SimpleLayout project](https://github.com/nsquaredsolutions/dashboard/tree/main/Samples/SimpleLayout) as a reference
- Keep components modular and reusable
---
_Next steps: Follow each section in detail to implement your own layout._